

How To Change Font Size In Obs Studio
In this tutorial we'll tell you about OBS settings and features, which are you need to know to perform your live streams.
This streaming guide is well-nigh general OBS settings. Nosotros besides recommend you read tutorials with specific instructions for your live streaming video platform:
- Twitch
- YouTube (streaming guide well-nigh this platform coming presently)
- Periscope
Bones Requirements
Operating system
Windows:
- DirectX 10.1 compatible GPU
- Windows 8 or newer
macOS:
- Intel CPU (PPC is non supported)
- OpenGL 3.ii uniform GPU
- macOS ten.10 or newer
Linux/Unix
- OpenGL three.two uniform GPU
- X window organization
Drivers
Please make sure to apply the latest drivers for your GPU:
- NVIDIA
- AMD
- Intel GPU drivers are usually available from your motherboard manufacturer, but can likewise be establish hither.
Stream Settings
The procedure of OBS setup for streaming tin be divided into two master stages:
- Getting and inbound of your credentials for streaming service (URL and Stream key)
- Setup of video and audio options which are meet the recommendations of your streaming platform (eg. Twitch, YouTube, etc.)
Encoders and Quality Presets
Recommended encoders:
- NVIDIA NVENC H.264 is the all-time encoder in terms of quality and performance (as of 2020). Recommended if available.
- x264 is recommended to use for the best quality if NVIDIA NVENC H.264 is non available on your hardware. But go on in mind what x264 is the most processor-intensive encoder and yous need a adept processor to utilise x264 without lags in processor-intensive games.
CPU Usage Preset (just with x264)
At that place are many bachelor presets:
- ultrafast
- superfast
- veryfast (default, recommended)
- faster
- fast
- medium
- wearisome
- slower
- veryslow
- placebo
They are arranged in ascending order of quality and descending of operation, i.e. "ultrafast" has the best operation and worst quality, and "placebo" has the worst performance(very loftier load of the processor) and best quality.
Only in fact, only the outset 3 are useful for streaming purposes and have a pregnant difference in quality. All other presets after tertiary take a big difference in performance only almost have not whatever difference in quality. This is why "veryfast" is recommended as the best balance between quality and functioning.
Other hardware encoders:
Hardware encoders (except the NVIDIA NVENC H.264) are generally recommended for local recordings, but not streaming. They can be a final resort if NVIDIA NVENC H.264 or software encoding (x264) is not possible. They offering minimal performance impact in commutation for a reduction in quality at the aforementioned bitrates as NVENC or software (x264) encoding using the default preset of veryfast. Currently, all consumer-level hardware encoders are provided past certain GPUs, equally listed below.
- QSV aka Intel Quick Sync Video has medium quality and performance. Available only on systems with processors that support Intel QSV.
Intel HD Graphics GPU on Intel Core-i-CPU 2xxx (Sandy Span) or newer. Due to the low quality of early on iterations of QSV, Intel Cadre-i-CPU 4xxx (Haswell) or newer is recommended.- QSV may require UEFI/BIOS configuration to enable information technology (in most cases you need to enable "Multi-Monitor" or "Internal Graphics" setting)You lot can effort QSV if you have performance issues with x264.
- AMD Avant-garde Media Framework (AMF) has a ameliorate performance only worse quality than NVENC, QSV, andx264. Available simply on systems that back up those encoders.
You lot can try to use it if you have performance bug with x264 and QSV.
How to create a scene in OBS Studio
The Scene is your main working surface area where you lot can control the view of your stream: add sources such as game, chat or webcam.
Y'all tin can create several scenes with different sources and switch between them. It'southward useful when y'all want to create unlike scenes for different games or IRL streams, etc.
How to add together a source in OBS Studio
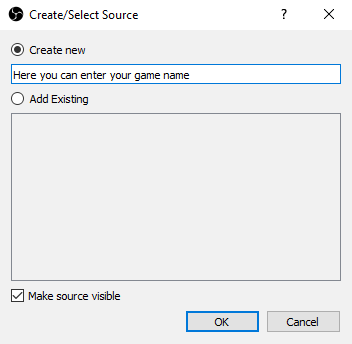
Ok, let'south ready our first scene. By default, the kickoff scene hasn't any sources. You need to add together them. Start OBS and a game or program which y'all want to capture. Click the "+" icon nether the "sources" panel and then click "game capture" or "window capture" depending on your needs. Set way to "capture specific window" and select a window that y'all desire to capture.
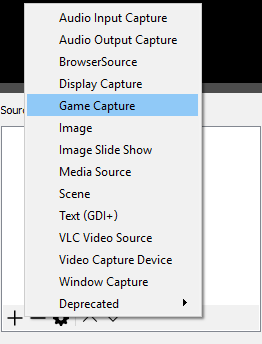
It's pretty easy, doesn't it? In that location are a lot of source types. The same way you lot tin can add together any other sources, for example you can add together your webcam, any prototype, text file, or even donations.
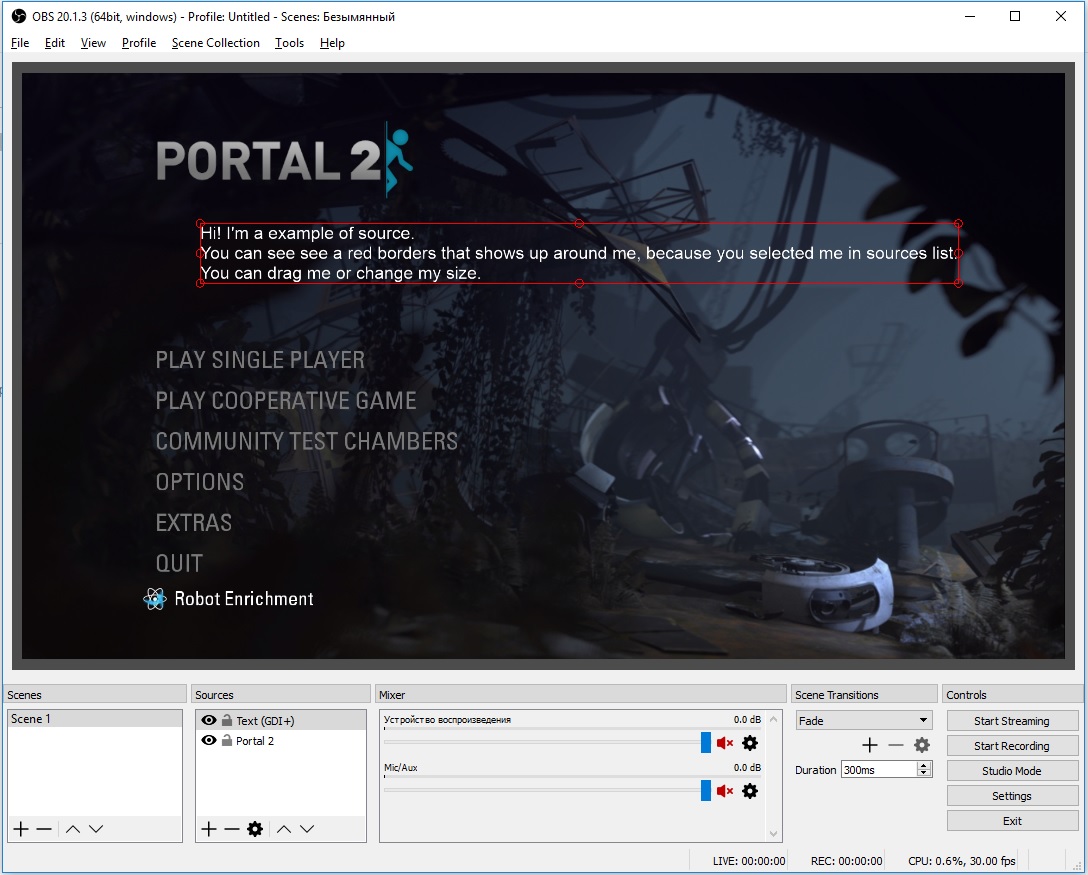
You tin re-align sources in the preview and alter their society by using drag and drop in the list or using the up and down arrow buttons. A Source that is listed above some other Source in the list will exist on top and might hibernate what'southward beneath it. This tin likewise be useful for situations where you want something on superlative of another source, like a webcam to prove over your gameplay. Any time you see an heart icon, y'all can click it to show or hide the associated item with information technology (this applies to filters besides).
When a Source is selected in the Sources listing, you volition see a red box that shows up around it. This is the bounding box, and can be used to position sources within the preview as well as brand the source larger or smaller.
How to crop a source in OBS Studio
If you demand to crop a source, hold the ALT key, and elevate the bounding box. The edges volition change to green to show it's being cropped. You lot can see both techniques being used here to crop and enlarge just the part of the screen we want to show:
Hotkeys and other settings for sources
If yous, subsequently on, change theBase (Canvas) Resolution of OBS Studio, you volition have to re-align or re-size the sources. Irresolute theOutput (Scaled) Resolution does not have this event.
The following Hotkeys are available in the preview to tweak the source position and size:
- Concur CTRL to disable Source/Border snapping
- Agree ALT + drag the bounding box to ingather
- CTRL+F for fit to Screen
- CTRL+Due south for stretch to Screen
- CTRL+D for centering to Screen
- CTRL+R to reset a source size/position
Y'all can also correct-click each source in the list to access further options. This is where you access the Filters sub-menu, which is described in detail in our Filters Guide.
Source Descriptions
Audio Input/Output Capture
Warning: Audio Input/Output Capture source can cause an echo issue if you have the aforementioned device selected in Settings -> Sound. If you programme on calculation audio devices directly to your scenes, brand sure they are disabled globally commencement.
This source allows yous to add an audio input or output device (i.due east. microphone or headset respectively) to a specific scene. Simply choice the device you wish to capture, and the audio from that device will be captured when the source is active. These sources tin be useful if you lot only want specific audio devices active in specific scenes, rather than globally through all of OBS.
Blackmagic Device
The Blackmagic Device source allows you to add a diverseness of Blackmagic Design capture cards, using their provided developer SDK to ensure the best possible compatibility.
Blackmagic Device source has the following options:
- Device: The Dropdown list that allows y'all to select the Blackmagic Design device you wish to utilize.
- Manner: Sets the video style of the device. This should match your media (i.e. camera or game panel) output resolution and framerate.
- Format: Selects the video format the device runs in. This should also match your media output yous wish to capture.
- Utilise Buffering (Checkbox): Enables or disables the apply of buffering on the video/audio for the device. This can help with bug on systems with low resources available or a device with bad drivers/other hardware issues.
BrowserSource
Browser source is one of the most versatile sources bachelor in OBS. It is, quite literally, a web browser that you can add directly to OBS. This allows you to perform all sorts of custom layout, image, video, and fifty-fifty audio tasks. Annihilation that you can plan to run in a normal browser (within reason, of form), can be added directly to OBS.
Browser Source is fairly straight forward with its options.
- Local File (Checkbox): Tells the source if you are loading a web page from your local motorcar, or remotely.
- Width: Sets the viewport width of the browser page.
- Height: Sets the viewport height of the browser folio.
- FPS: Sets the FPS the browser page will render at.
- CSS: By default, sets the background to exist transparent, removes margins on the body, and hides the curl bar (if the page renders larger than your viewport width/height)
- Default CSS: body { background-color: rgba(0, 0, 0, 0); margin: 0px auto; overflow: hidden; }
- Shutdown source when non visible (Checkbox): Unloads the folio when the source is no longer visible (by clicking the eye icon to hide, or not in the active scene).
- Refresh browser source when the scene becomes active (Checkbox): Refresh the page when it becomes active (the scene is switched to)
- Refresh enshroud of the current page (Push): CLicking this will immediately refresh the folio and reload any content.
As Browser Source is based on CEF, any CEF flags (–enable-gpu for example) can be passed from the OBS Studio shortcut. A adequately comprehensive listing can be establish hither
Color Source
Equally the name implies, this source creates a solid color for you to add to your scene. This tin be used for things like background colors or fifty-fifty a global color tint by using the alpha aqueduct.
Color Source has the post-obit options:
- Color: Allows you to set the color the source will brandish. This is also where y'all set whatever desired alpha.
- Width/Height: This allows you to set the resolution of the source. The primary indicate of irresolute this would be to gear up an aspect ratio that matches your canvas display.
Display Capture
Brandish Capture is used to capture your entire monitor. The options here are few, with a pick for the display you wish to capture, and a checkbox to enable or disable showing of your cursor.
You can only add ane display capture source per display. If you need your brandish in multiple scenes, make sure you lot use Add Existing!
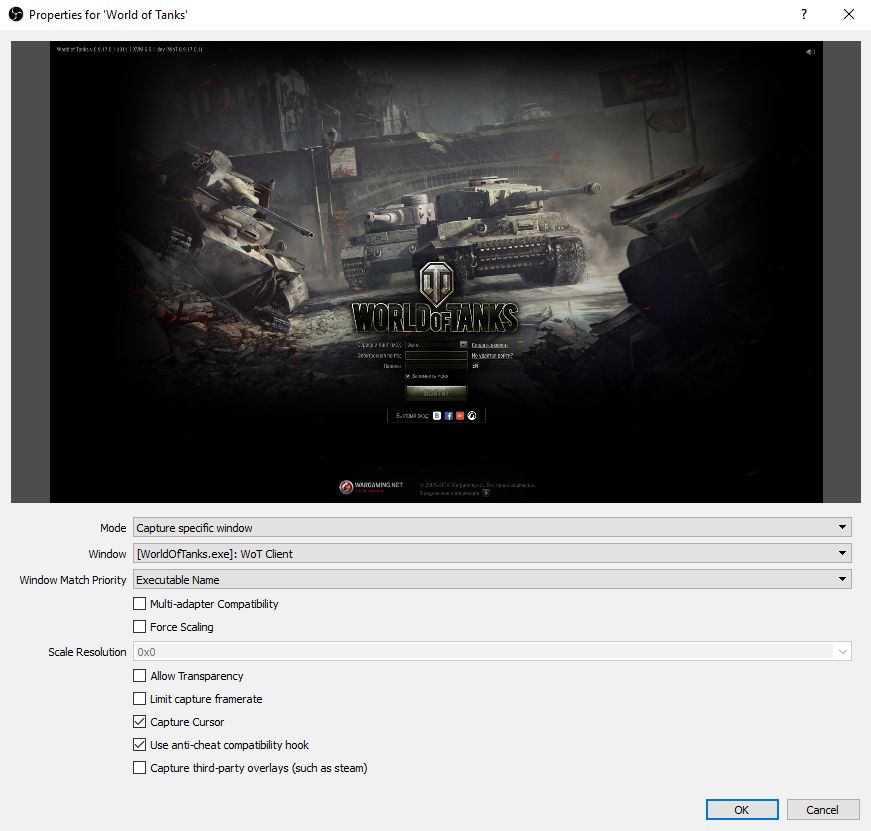
Game Capture
Game Capture is 1 of the primary sources that many users will be looking to use. This Source lets you direct capture the game you are playing, so long as it's DirectX or OpenGL. Game Capture is the most efficient way you can add your games to OBS, and should always be tried first. There are simply a very small-scale number of games that do not work with Game Capture.
In one case you add your Game Capture Source, yous will need to select a few options that suit your current needs. First is the Mode.
- Capture any fullscreen application
- Capture specific window
- Capture foreground window with a hotkey
The first option,capture any fullscreen application, will automatically notice any game running fullscreen on your primary monitor, and add the video output to the Game Capture source in OBS. If y'all play your games fullscreen, this is the option you should choose. Note that if yous only accept a unmarried monitor, alt+tabbing out of the game to check OBS will crusade the game to stop rendering, and so yous won't see information technology show up in the OBS preview.
The second pick,capture specific window, allows you to simply select the active game you want to capture. Window Match Priority lets you select which parameters will be used to separate the available windows. For case, if y'all have two clients of the same game running with the same executable name, but different window titles, irresolute the Window Friction match Priority to Window Title tin can be very helpful in selecting the proper game to be captured. Experiment if you have issues selecting the right game and see which works best for yous.
The terminal selection,capture the foreground window with the hotkey, lets you set a specific cardinal to tell the Game Capture source which game y'all want to testify up. This is very useful if you alter games oft during a stream, and you don't want to accept to go back into the Game Capture properties every time to select your new game. The hotkey can be set under Settings -> Hotkeys once the Game Capture source is added to your scene.
At that place are several other options, and we'll give a curt description of them. In full general, the default options are sufficient for most applications and yous should non change them unless you know why y'all need to, and understand what they mean. As always, if you lot have whatsoever questions, please finish by the forums or conversation.
- Multi-adapter Compatibility: Used for systems that have multiple GPUs (such every bit a laptop). It changes the capture method from shared texture capture to memory capture. Memory capture is far less efficient than shared texture capture, and this option should only be enabled if yous have no other options.
- Force Scaling: Allows you to strength a calibration on the capture source.
- Limit capture framerate: Limits the Game Capture source from capturing at a frame rate higher than OBS is set to use.
- Capture Cursor: As implied, this volition either show or hibernate the mouse cursor in your game. It does not apply to mouse cursors rendered in the game itself, those volition always exist captured.
- Utilize anti-cheat compatibility hook:
- Capture tertiary-party overlays (such as steam): If your game has an overlay that doesn't disharmonize with Game Capture, this volition allow Game Capture to capture information technology as well.
Image
This source allows you to various image types to your scene. Most paradigm formats are supported. Alpha channel back up is also available where applicative.
The only options in Image Source are the path to the image, and unload image when not showing. This checkbox will unload the image from memory while it is not active, which can be useful if you accept a large number of images and a few system resources available.
Epitome Source supports the following image formats: .bmp, .tga, .png, .jpeg, .jpg, and .gif.
Paradigm Slide Show
The Image Slide Show Source allows yous to add multiple images that volition rotate through equally a slide testify. To utilize this source, click the + sign to add either individual files or directories to be loaded. Once you have all the images you want, you tin can configure how you want them to display.
- Transition: This dropdown box allows you to select the animation type that will play during a transition between files. The default is a simple fade, merely information technology can be changed to a cut, slide, or swipe
- Fourth dimension Between Slides (milliseconds): Equally the name implies, the time each image volition be displayed earlier initiating a transition to the adjacent.
- Transition Speed (milliseconds): This is how fast the transition animation will take to go from starting to completely change to the side by side image.
- Annotation: This value does non increment the time between slides. For example, if yous take the Time Betwixt Slides fix to 10000ms, and the Transition Speed set to 2000ms, the transition volition BEGIN at 8000ms from the stop of the last transition, with the adjacent slide being fully visible at 10000ms. If this value is Higher than the Time Between Slides, it volition automatically reduce the fourth dimension to lucifer. Information technology also cannot exist lower than 50ms.
- Randomize Playback (checkbox): This selection will let yous choose if you desire to randomize the images being played. If this is enabled, the adjacent image will be randomized at each transition. If disabled, they will exist shown in the order of the file list.
Paradigm Slide Show Source supports the post-obit image formats: .bmp, .tga, .png, .jpeg, .jpg, and .gif.
Intel® RealSense™ 3D Camera GreenScreen
This source blazon will let you to utilise the digital green screen features of an Intel RealSense camera. RealSense cameras have a combination of a normal photographic camera, infrared lasers, and an infrared camera to map the space in front of your PC and detect which parts of the video can be removed in a green screen issue. In that location is no configuration necessary for this source, simply add the source, pick your camera, and watch the magic!
Media Source
Media source is a groovy option to add all sorts of different media types to your stream. The currently supported file types are:
- Video: .mp4, .ts, .mov, .flv, .mkv, .avi, .gif, .webm
- Audio: .mp3, .aac, .ogg, .wav
But click the Browse button to select your file, or uncheck the "Local file" box to let a URL or other remote location to be added. For remote files, the URL/path goes in Input, and mostly Input Format can be left bare.
Once the file has been selected, in that location are but a few options that would need to be looked at.
- Loop: Sets if the file will loop back to the beginning once playback has completed. Useful for .gifs
- Restart playback when the source becomes active: This volition allow yous to set the file to restart once the source is active. Active ways in the current visible scene
- Use hardware decoding when available: Fairly self-explanatory!
- Hide source when playback ends: If enabled, the source will automatically hide itself when the file has completed playback. Useful for video files then they do not show the last frame indefinitely.
- Advanced: These options should only exist accessed by users who understand what they are, and why they need them, and then they will not be covered in this guide.
Scene
This Source is often overlooked, and while one of the simplest in part, information technology can allow for some of the almost powerful functionality in OBS Studio. Since all Scenes are considered Sources, you tin can add an entire Scene equally a Source anywhere you desire.
For example, this tin allow you to create a static overlay that you want to use in every Scene, chosen Overlay. In several other scenes, let'south say Master and Game, you tin can add the Overlay Scene. If whatsoever changes are necessary to whatsoever of the Sources in Overlay, you can merely update them it will be updated everywhere else. This is merely i of many examples of how this Source type can be used!
Text (GDI+)
Text source can allow you to add simple text renders to your stream or recording layout. To become going, most of the default settings volition be fine (except maybe the colors), and you can merely blazon what you lot desire your text to say in the field labeled "Text."
If you lot want to load the text from a file, only cheque the "Read from file" checkbox, and select the file that has the text yous want to read in it. The file must be UTF-8 (nearly default text files will be), and the file will be reloaded on save. This means y'all can edit the file and it will automatically update.
In one case the text is present, there are quite a few options for styling it. You can:
- Change the foreground color
- Change the groundwork color
- Add together a gradient
- Adjust the opacity (transparency/blastoff)
- Set the horizontal and vertical align (relative to the ruddy source bounding box)
- Add an outline (with options for size, colour, and opacity)
- Use custom text extents for the size of the source, as well as if the text should wrap if the width is exceeded.
VLC Video Source
Similar to Media Source, yous can add video and other media files to this source to be played in your scenes. This source type will apply the VLC libraries for extended media support over the built-in Media Source. Information technology requires that VLC be installed on your system to show upward as an available source in OBS. If you lot are using 64bit OBS, y'all must install 64bit VLC and if you are using 32bit OBS, you must install 32bit VLC.
To add together files, click the + sign to browse to your file, directory, or URL that yous wish to add. If you add multiple, they volition be played in the club they were added. If the Loop playlist is checked, the playlist volition get-go over once the stop is reached.
The Visibility behavior dropdown menu allows y'all to cull how visibility affects the playback of the files. They should be self-explanatory.
Video Capture Device
The Video Capture Device Source allows y'all to add a variety of video devices, including but non limited to webcams and capture cards. On Windows, for a device to work with OBS the drivers need to support DirectShow output. Since DirectShow is the standard output format for Windows, there's a skilful chance that this is what your device outputs. All major webcams and capture cards support DirectShow and will piece of work with OBS.
To add together your device, merely add together the Source, open the properties, and select your device from the Device dropdown list.
You then have several options to configure it:
- Conciliate/Agile (Push): Clicking this will either turn your device off (when it reads Conciliate) or on (when information technology reads Actuate).
- Configure Video (Button): This push volition open up any driver configuration utilities. For example, with a Logitech webcam information technology will open the Logitech photographic camera configuration software for enabling custom options similar facial tracking. With a capture card, information technology might open up the options to configure the input resolution and FPS.
- Configure Crossbar (Push button): Opens the device's Crossbar Configuration, if bachelor. Consult your device'due south manual for more data.
- Resolution/FPS Type: Most of the time this tin can be left on Device Default. If you are having bug with your device showing up, change it to custom and the following options become available to set manually:
- Resolution: This sets the base resolution for the video device. Make sure it's a way that your device supports!
- FPS: Sets the FPS of the device.
- Video Format: If your device supports multiple video output formats (Such every bit MJPEG or XRGB), yous can select the preferred format here.
- YUV Color Space: Sets the color space the device will output in.
- YUV Colour range: Sets the colour range the device will output in.
- Buffering: This has 3 different modes, Enable, Disable, and Auto-Detect. Enable will plow buffering on, which can help if you are getting stuttering during playback. Setting to Disable will turn buffering off, which tin can help if you are experiencing a delay on the device. Auto-Discover is recommended, as it will attempt to ask the device which method is preferred.
- Flip Vertically (Checkbox): Flips the video image vertically. Some devices volition (rarely) send the video input upside downwardly.
- Audio Output Mode: You can set up to Capture Merely (significant y'all volition not hear, without Audio Monitoring), or Output desktop audio (DirectSound/WaveOut). Enabling desktop output will send the device'southward sound out through your organisation default device.
- Use custom audio device (Checkbox): When enabled, the Audio Device option becomes bachelor, and allows you to use a separate audio device that will exist linked to your video device. This can be useful if you lot want to utilise an external microphone on a webcam, for instance, and want to tie the audio directly to the Source itself.
Window Capture
Window Capture allows you to capture a specific window and its contents. The advantage of using this source over Brandish Capture is that only the selected window volition be shown, even if at that place are other windows in front of it (WIN7 Annotation: Having Aero disabled tin interfere with this functionality.).

How To Change Font Size In Obs Studio,
Source: https://projectobs.com/en/tutorials/how-to-setup-obs-studio-for-streaming/
Posted by: whitmannosty1997.blogspot.com
0 Response to "How To Change Font Size In Obs Studio"
Post a Comment